Wednesday, February 24, 2016

A Post-less Year of Projects

My high-school English teachers would be very disappointed in me.  A whole year with nothing posted!  Like any art form, writing should be practiced every day for an hour at least but alas, doing other things with my hands has gotten in the way of my intentions to keep up with this blog.  Today, however, I'm finding the silver-lining in feeling like I'm being alternately dunked in the Yellowstone hot springs and the Volga river mid-January.  That's right, it's cold season in the house and just like the jelly-of-the-month club, illness brought home from school is truly the gift that keeps on giving.  I'll need to have real heart-to-heart with my Trusty Assistant about what he brings home.

So while I sit here wrapped in a blanket, armed with a hot toddy (the Irish cure for what ails you) and an over-used handkerchief, I will finally take some time to reflect on the past year's accomplishments.  
The Bridges of Portland (a.k.a. Bridgetown) are much more
romantic than Madison County.  If you're an engineer.
If my recollection of time is somewhat accurate, I finally got around to framing one of my favorite posters acquired during a charity auction.  I wanted to give the frame a good weathered look so I used a thoroughly aged pallet with a gray patina on the wood.  Unfortunately, with the age, the boards were also all slightly warped.  Cutting the corner angles to match turned out to be an exercise in futility so, leftover metal flashing to the rescue!  I had a small roll of galvanized flashing left from the front porch project and created some custom corners to add stability to the frame and hide the errant corner angles.  Considering the subject of the poster, the flashing adds a great touch.  Even the screws to attach the flashing were salvaged from something else that was deconstructed so, I can safely assert that at least 75% of the materials for the framing are reclaimed or re-purposed.  We can debate calculations later.


Cabinets and shelves.
You put things in them and on them.
The next project was the largest time consumer of the year.  This is Phase II of basement reconstruction.  Our north wall in the remaining basement was pretty much useless.  I had my small workbench area and we had some small shelves for toys but with the way the plumbing was set, it was a very unusable space.  So, my idea was to add extra storage for all the junk we think we need to have on hand in case of an apocalyptic event.  As you can see the idea was to alternate sets of closed-door cabinets with open shelving to help us better organize all that junk.  Since we have no garage (yet) and the attic is a pain-in-the-ass to get in and out of, this was a priority for me.  
Trusty Assistant demonstrating
the scale of the furniture.

I hate to say it but this not reclaimed material.  I purchased knotty pine boards from Shurway Lumber to make the basic frames and shelves.  The door paneling on the cabinets is hemlock.  This project was a real first for me because the shelves and frames were made by gluing panels of pine boards together rather than buying project boards of white "wood" from Home Depot.  An extra pair of 3' wood clamps was also a must for this one as the gluing process takes a lot of waiting time.  Thankfully, it was a really nice summer and I was able to let many of the panels set outside. The project was a success although I learned quickly that staining and varnish application must absolutely be done outside or in a well-ventilated area.  And always make sure you cover the stain with a good varnish!

It's game time!  Bring on the hexes.
I declined to put a North on the compass rose out of pure spite.
 The next project was intended to be a Christmas present but instead is being held for someone's birthday.  This was my second attempt at a Settlers of Catan board.  I used the leftover hemlock paneling from the cabinets for the fascia and a leftover chunk of project board that's been floating around the basement forever that was just the right size.  The cork rolls were something we discovered at Scrap.  I wanted to keep the illustrations simple as opposed to my last board which was painted to somewhat duplicate the original Settlers frame.  For this board, I used my engineering pens to draw the coastline, ships, and compass rose and then covered it all with a natural stain and semi-gloss varnish.  

Also, throughout much of the year, I was working on this, a painting of the fishing vessel Takako in Ilwaco harbor.  It's acrylic on canvas board, 16" X 20".  The sail insignia really drew my attention to this one and with the background of Jessie's Ilwaco Fish Co., I thought it was just a great scene.  I have yet to frame it as I'm waiting to find some good weathered wood or some more salvage tongue-and-groove to pull it together.  If you want it unframed, it's yours for $500.


Takako, Ilwaco Harbor, WA
Right; Mine: Left; Trusty Assistant's


Also throughout the year, we were connected with a local egg-producer that sells the best eggs imaginable.  Of course, not all eggs are to be eaten.  Some are ovoid canvases waiting to be inked.  This year, I decided to try out a Germanic Celtic theme rather than my usual Gaelic Celtic knots.  Also this year, my Trusty Assistant wanted to try his hand at the art of Pysanky.  While my Trusty Assistant's first attempt at a pysanky egg was not what he intended, I think this one of the best "happy accidents" I've ever seen.  I just love this egg.

Now, of course I can't just sit idly by (although when racked be a fever sometimes you have to give in), and there are many other projects in the works or on the horizon.  The current project is a replacement of my basement workbench which was a hobbled together mish-mash of whatever was in the house when we bought it.  It's wobbly, heavy, and unstable but it has done its job for years.  I'm working on replacing it with a new bench made completely out of salvaged material (minus the fasteners).  Work is progressing but hopefully much quicker now with the acquisition of a Pallet Paw.  I had several attempts this summer of welding my own but (sorry Dad) the welder I had was inadequate for the task.  I've already deconstructed a couple pallets with the Paw and looking forward to the ease of the task compared the ole' pry-bar and hammer.  Also on the schedule is a triptych of our Nicaragua trip in ink and watercolor.  No guarantees on an actual completion date.

I hope you all had a productive and informative 2015.  To my high-school English teachers, Mrs. Cartwright and Mrs. Munk, I sincerely and repeatedly apologize for my lack of practice.  Thank goodness I'm not being graded.  I hope you all find inspiration and motivation in 2016 and I'm looking forward to sharing more.


Friday, January 2, 2015

What Happened to 2014...?

I know that 2014 was a quiet year for the Malleable Monarch although not necessarily a quiet year for life events.  Even though there was not much in the way of online activity, it doesn't mean I was idle during the year.  We had quite a few projects that were completed this year including a deck and shed at a beach house, a carport for some relief for the elements, and replacing our old water heater for starters.  But the big projects didn't occupy all of our time.  The original Malleable Monarch stove is back in the works after getting most of the frame sandblasted free of rust.  I hope to get it back to it's former glory although it's a slow, pain-staking process.

Our old barbecue was also due for a makeover since the bottom had rusted out.  We looked at some options of purchasing a new one but we really aren't big barbecuers in the first place.  So instead of upgrading to something bigger that we wouldn't use, I decided to make this an excuse to play with the welder.  Originally, the barbecue came with a central heating plate that disbursed the gas flames around it's circumference and helped keep the heat contained.  The plate had completely rusted away along with the bottom of the barbecue main cylinder.  To fix that, I used an old square metal cover from an electrical junction box that had a 1/2" center knockout which fit the gas in-line nicely.  Cutting the bottom of the cylinder to match, I welded it into place and drilled three holes for mounting bolts to support the new heating plate.  After that, I spray painted it with heat-resistant black barbecue paint.  For the heating plate, I used an old 7 1/2" diameter circular saw blade.  The hole in the middle of the blade needed to be covered  since it would let the flames right through instead of dispersing them to the outside edge so I used the 1/2" knockout plug from the junction box cover and welded it over the hole.  I then drilled three holes to match the mounting bolt placement and set it with nuts and washers placed underneath to balance it.

Another big change for us this year was the addition of a new car.  Our old trusty Subaru was starting to show some serious signs of age after 200,000 miles so we decided it was time to get something a bit more reliable.  While we were making that decision, we also wanted to get something economical as a commuter car and we opted for a plug-in hybrid.  With plug-ins, you can't just run an extension cord from any old outlet, so I installed a dedicated outlet and circuit for the charging unit.  We also needed something to hang the charging cord from.  It came with keyhole screw mounts that you could use if it were more of a permanent placement but I know We knew we would be taking the cord with us when we traveled so we wanted something a bit easier to use than the keyhole screws.  Instead, I used used scrap pallet wood to make a mounting fork for the unit and installed it next to the outlet.  It looks much nicer than a couple screws in the wall.

Finally, I found time to finish up a little project for Bree that we had discussed.  Her collection of necklaces was getting to be too much for the box they were housed in and it was becoming quite a clutter.  So we found a lovely piece of driftwood and I found a set of antique ceramic drawer knobs for $4 at an antique store.  I used the router to put a couple of keyhole mounts on the back and then some drywall screw anchors to hang it up in our closet.  It's too bad that it's in the closet since it looks pretty darn nice with the jewelry on it!

There were many more small projects here and there in 2014 but these were my most memorable.  I hope 2015 has many and more opportunities and possibilities for creativity and I hope you all enjoy reading about what's in the works.

Monday, February 17, 2014

Getting Lit

A close friend has recently been perfecting the art of cutting bottles to make glasses and candle holders.  When he told me he didn't have any plans for the tops of the bottles I asked him to save them for me because I had an idea.  My brilliant idea was to turn them into a lamps but I didn't want to just stick with a single lamp, no, no...I had to go bigger.  After picking up a box of bottle tops on our last visit, I picked five green tops (four Lindeman's Framboise and one Anchor Brewing Christmas Ale) that would work to make a good ceiling light fixture.  I'll save the others for some single lamps at some point but for now, the rest of these will have to go back into the box and get packed away. 

My thought was to group them all together in a bunch but after considering the possible lack of stability and materials, I was afraid they would too easily knock against each other and possibly break.  As a way to avoid that, I thought I would try to keep them stable and separate by encasing each of them in metal ring frames which would be individually attached to a central ring.  For this I used some basic galvanized steel 10 gauge wire from the local hardware store.  This may have been a mistake.  The wire itself was pretty malleable and I created the rings just using a vice and pair of pliers.  Joining the wire turned out to be a bigger problem.  At first I thought my little 25W pencil soldering iron and some silver solder would do the trick but I  found out that wasn't going to cut it.  Luckily, I was able to borrow a 40W chisel tip soldering iron and with some flux.  After many attempts and many times redoing the solder welds, I was finally able to get them to hold.  I also learned that I obviously need some practice soldering.

The wire cages were built around the bottle tops which caused some issues later on with the weight of the tops causing the welds to fail.  After that, I used 3/8" flexible conduit to attach the tops to an old steel junction box that I had on hand.  To attach the conduit to the tops, I used screw-in connectors and sawed off the ends that connected to the junction box.  I then glued the connector to the top of the bottle after roughing up the glass with some sandpaper.  I think there might be a better way of connecting them if a 3/8" to 1/2" screw-in connector existed but I couldn't find one anywhere.


For the junction box to connect to the ceiling, I found an old lamp fixture at Habitat for Humanity and removed the bottom half, saving the ceiling mantle with it's angle slightly modified to match the screw holes of the junction box.  I grabbed a cover plate with a center knock-out to feed the wires through.  Lastly, for the lights, I had to buy five candelabra lamp bases and glued them into the bottle tops after attaching the wires.  In the end, I was pretty happy with the result.  I'd like to be able to use some lower profile lights since the CFLs, even the 5W miniature ones, seem to stick out from the base of the shades a bit too much.  Now the only thing left to do is find the right spot for that industrial-alien-lounge feel.  I'm sure the bedroom will be perfect.


Sunday, August 18, 2013

Teddy Bear Pirate Ship

Ye Bucket O' Scrap
Recently our neighbors invited us to their house for their son's fifth birthday party and they went all out with the pirate theme.  I don't think I could ever hope to be that organized and creative to plan something out so well but my son and I did leave the party with pirates on the brain.  The next day, my son decided that his teddy bear's birthday was soon to occur, coincidentally on the same day as one of his grandfather's birthdays.  And, for his birthday, Teddy wanted to be a pirate.  Go figure.  For some reason I had the itch to do some carving and so I reached into the bucket o' wood scraps and pulled out some excess 2" x 2" fir and some shavings from the latest frame made out of old tongue & groove.
Beware, these be sharp!
  Ever since a friend, artist, and fellow Eagle alumnus, Michael Smith, showed me how he carved wood for his beautiful block prints, I've wanted to experiment with some hands-on carving of my own.  He told me of a great shop in Portland that carries a great beginner set of carving tools and oh, so much more.  Woodcrafters is amazing if you ever get a chance to stop in.  It's a good thing I'm on a budget some of the time or I could have spent much more time and money while there.  BTW, it's also very close to Voodoo Doughnut's east-side location.  What I did end up with, besides a frame brace that has come in very handy, was a beginner set of hand carving knives and a good slipstrop by Flexcut for sharpening the blades.  The best part was that the set of carving blades came with a handy set of bandages.  Thankfully, I've yet to use them.
     From the 2" x 2"piece of doug fir, I carved the hull of the boat and with the long slivers from the tongue & groove I carved and sanded the masts and yards.  I notched the bow to attach the bowsprit and then anchored it with wood glue.  To set the masts, I drilled holes to match the size and left them loose, with the exception of the fore-mast, so that if there were ever a naval battle and the poor ship lost a mast, it would not have to be broken out and remade.  To attach the yards, I notched the mast and yard to fit then bound it with brown string and a dab of glue to hold in place.  Finally, for the sails, I had some extra muslin leftover from may last canvas creation and cut sails out of that.  I tied them on with needle and thread but left the bottoms stays off partly because I was investing way too much work on this project and partly because I am no fan of sewing.  The only thing remaining to do now is test it in water and make a stand for it since it keeps falling over.
Sailing the high-table seas.
     In the end, my son said said Teddy would love it and that he would ride it, right between the fore-mast and main-mast.  I guess as long as he's wearing an eye patch that will be fine.


Sunday, May 26, 2013

What do I do with all this leftover OSB?

As you may know, I'm quite averse to throwing things in the trash that can either be reused or recycled for something useful.  Lately, along with my father-in-law, we've been building a new shed and as part of the aftermath of that project (which I'm sure I'll post on later), there was quite a load of OSB scrap.  If you don't know, OSB stands for oriented strand board and it's become the building industry's predominate choice for sheathing of smaller buildings.  You don't want to burn it since it's pressed together with chemical-laden glue but it can be safely shredded with other wood products.  Even thought that's better than letting it go straight to the land-fill, I know there has to be better things to do with it than that.  So, the bed of my truck is currently a home for several different pieces of medium-sized OSB waiting to be used for something good.

What's in the box?
One project I'm sure I'll repeat was the Tuna Tier cat tower (see previous post).  In the meantime, there was something else I needed to do.  While I've really enjoyed using my new Porter-Cable jigsaw (thanks Dad & Mom!), it didn't come with a case and I've been toting it around in it's cardboard box.  Unfortunately, during one work session on the shed it started raining and as you can imagine, corrugated cardboard does not do well when wet.  So, I devised a plan to build a case for the jigsaw using the OSB and leftover pallet scraps (see other previous post).  Using screws, glue, and hinges that I already had on hand, the box was pretty much complete.  We made a trip to the Rebuilding Center for a handle and a latch to keep it closed and came back with the handle at least.  I'm sure I could have found a latch had there been more time but if you've ever been to the Rebuilding Center, you'll know that the organization of the hardware section leaves something to be desired.  So, the box is nearly complete, all that's needed is some inserts into the blade holes so they're not too deep (I'll cut some from some blocks of expanded foam that are still sitting in my basement) and a latch.  OSB used - check.  Carrying case for jigsaw - check.
Thanks to Mon Ami for the lovely coffee cup
to help fuel my projects

Now, I still have a lot of OSB left in the truck that needs to be put to use.  If anyone has some good ideas, please leave me a comment!  I have a few shelves that I need to build, maybe reorganize the shed here at home but other than that, I'm open to some new ideas.

Explorations In Cider Making

Bubbling in the basement
at a steady 68 degrees

With the local scene (a.k.a. my neighborhood) replete with home-brewers, I've been feeling the need to join the fun for quite some time now but I've never made the time to get properly started.  Well, a couple weeks ago when I had some free time and money I finally committed to going and buying a full-on brewing kit from the local brew supply store, Bader Beer & Wine Supply.  To get buy-in from my wife, I told her I would start by making hard cider instead of beer.  Since this wasn't the season for ripe apples nor do I have ready access to a cider press, I decided to start with store bought soft cider as my stock to convert to hard cider.  Without the necessary brewing steps required by beer, this was a pretty easy undertaking and the results were well worth it.

I tried to find a local cider but since I'm not much of pre-planner, I had to find whatever I could in a pinch and used TreeTop's three-apple blend since it wasn't from concentrate, had no additives, and was already pasteurized.  Even though it was still pasteurized, I still brewed it just below simmering for about an hour.  One thing I learned in that process is that it takes a long time to heat up five gallons as well as letting it cool down.  I added three cups Muscovado brown sugar during the brew process for flavor and to up the alcohol content.  In the end, I'm not sure how much affect this had on the flavor but the final ABV was approximately 6%.  It took nine days to ferment and then I let it clarify another seven before bottling.  At bottling, I added another 1 3/4 cup honey and water mix to get some fizz once in the bottle.  Of course, I wanted to taste the fruits of my labor right away but the first bottle was just okay.  However, after letting the cider bottle age for another week or so, it has sweetened up and the carbonation is nice and light.  
Only $7.80?  Sold!

I'll be starting batch number two very soon and experimenting some more but I have to say this was pretty fun and having 27 bottles of cider ready to give away or consume is pretty cool.  With the initial cost of the brewing kit, sweet cider, and yeast, I figure it's only going to take me about 55 bottles to break even which is only two full batches compared to retail hard cider costs of around $4 per bottle.  After that, it should only cost me around $1.30 for each full bottle, what a deal!


Tuesday, April 9, 2013

Bucket List

After the squirrels so kindly chewed the zipper out of the bag I had on the front of my bike, I started looking for ideas on what I could use to carry stuff by bike.  I found several ideas online including DIY bike panniers and bike buckets which were the two I liked the most.  The panniers were made by taking two grocery totes and sewing the handles together to drape over a rear bike rack.  The design was fairly easy and by adding a couple of pieces of masonite the stiffen the sides, they would hold up their shape decently it looked like.  I especially liked how light weight they were and compact for storage.  On the flip side, they didn't look that sturdy and I had a feeling they wouldn't last long exposed to the elements.  They also didn't provide any protection for items I might want to keep dry.

The other idea that I liked was the bike bucket.  One of my friends is also a big proponent of the bucket and I'd seen him use his on many occasions when we would meet up at locations all over PDX.  The bucket design was also very sturdy, provided protection from the rain (very important around here), and best of all gave new life to cat litter buckets that would otherwise just be recycled.  The downside to the buckets is that they are heavier than the tote panniers and rather bulky so you have to have somewhere to store them when you don't want to use them.  Luckily, I have space in the shed to put them so storage wasn't a big deal but I can see that an apartment dweller may want something a bit more compact.  The design itself was pretty simple with just a little bit of work drilling holes and cutting sections out of the plastic side ridges.  The hardware list was also pretty minimal consisting of two cargo hooks, half a rubber bungee with hook, and associated nuts, bolts, and washers.  Total for all of that was about $7 per bucket.

I finally decided on the buckets for the extra durability (must protect the beer!) and for the fact that I wouldn't have to sew anything.  What can I say, it's not my strong suit.  My mother-in-law tracked down one bucket for me to experiment with and soon a couple of others arrived from another friend.  Unfortunately, Tidy Cat did not have street style in mind when they decided to make their buckets bright yellow with turquoise lids.  This would obviously not do.  Since I had quite a bit of primer left from my last effort of working on the pickup, I primed the first bucket with a dark gray and then we headed to the hardware store to find a good color for the buckets.  While there, I noticed chalkboard paint and decided it would be much more fun to make a surface that you could change on a whim and something that my son could help decorate with ease.  I coated the sides of the bucket with the chalkboard paint and added a semi-gloss black for the top.  The result turned out very well and the only problem I've noticed is that the paint chips off easily which is probably due to the underlying surface being too smooth.  For the second bucket and I roughed up the plastic surface with 60 grit sandpaper before applying the primer.  It's still drying between coats so I'll let you know how that works.

For a great compilation of all types of panniers and buckets try: http://www.instructables.com/id/DIY-Panniers/

The buckets I made were basically from this design: http://www.commutebybike.com/2009/12/09/how-to-make-bike-buckets/

Happy biking!


Sunday, April 7, 2013

Hooked

One of the neatest gifts my wife and I received for Christmas was from my in-laws in Montana.  They found a coat hook made by a local artist out of scraps of wood from around his studio.  We loved the design so much, we wanted to put it up right away but we couldn't seem to find a spot for it.  The only place we could really use a coat hook like this was in the mud room but we already had three well used hooks there.  So, instead of just one, I decided we need two more to replace the older ones.

I still had piles of scraps from the pallet chair project (see last post) and a lot in small sizes that would work perfectly for this.  I cut several small pieces in varying widths and took advantage of an old iron hook we hadn't used yet from Mint Tea.  I also had an old square nail that we found in our basement upon moving in and hadn't appropriated for something else.  For the outside border, I took some slats off of scrap lattice I had leftover from the front porch and they worked perfectly.

To finish, I sanded down the outside edges but left most of the rough-saw surfaces on the inner pieces rough to match the character of the original.  Since I was using pallet scraps that did not differ much in color, I used three different stains and a clear coat to simulate the variety of woods the original artist used and it didn't turn out too shabby.  With some counter-sunk holes and some drywall anchors, the hooks work great.

I wish I could say this was an original idea but the credit is due to Nick Mask of Six Fingers Studio who created the original piece and my wonderful in-laws who frequent Tart Gallery in Bozeman, MT.  Check out Nick's page for some more glimpses of the wonderful creations happening in the studio and check out Tart for an entire bounty of cool, local made art.  These aren't the type of things you'll find in the big box stores or, if you do, you can bet they were probably made on an assembly line somewhere with virgin materials and outsourced labor.  I strongly encourage you all to find your local Tarts and Six Finger Studios and support the local arts and crafts.

Thursday, December 13, 2012

Making Something Palletable

Ah, but ignorance truly is bliss.  After reading Garbology recently, by Edward Humes, I could not help but feel there is more that I can do.  Especially after my exposure to such great re-use sites as Pheonix Commotion, etc..  What really did me in though was a fairly innocent trip to the waste transfer station down the road.  I took a truck load of leaves (trust me, our compost bin cannot keep up with six plums, various neighborhood maples, and three cedars on a postage-stamp size urban lot) to dump off for industrial composting and they had recently moved the area where they accepted clean green waste to a larger open area.  When I got out of the truck to unload I was surprised that one of the mounds surrounding the central area was a bunch of wooden crates that had obviously contained some large material item at one point.  I actually got pretty upset right there that this would go to waste like that after one use.  Perfectly good wood suited for a variety of uses and instead of becoming part of something long-lasting and useful, it's dumped to be shredded into compost.  Looking back, I should have just loaded it all into my truck after emptying my leaves but next time I'll know better.

Two chairs, one pallet, and one big helper
Back at home, the unsightly pallets sitting across the street at our radiator shop neighbors all of a sudden became a mission.  I asked the manager of the shop if he minded me taking them to use on some projects and he told me he'd be happy if I did as it would save them the cost of dumping them!  The shop had recently taken delivery of a very large industrial radiator and the pallet for it was a single use one because of its unique size and was just going to be tossed in the dump for shredding.  I couldn't let this happen.  I hauled the thing across the street and dismembered it in the back yard.  I had an immediate use in mind for some of the wood as a cover for our new compost bin (thanks Dad and Mom!) and some of the boards I thought would make some good frame material (see my last post) but that still left a lot to do something with.  After some online research I finally settled on making some chairs for the beach house that could withstand the outdoors and would be cozy enough to either have on the front porch or the back patio around the fire.


The original clevis pin design holes with
the compromise wood brace
My first design was based off a picture I found online but without any set plans.  I thought I would modify it to allow for the chair to easily collapse flat for moving or storage.  To do so, I thought I would use a clevis pin setup to lock the chair back position for sitting or for storage.  This turned out to be way too flimsy and I was afraid it wouldn't support any weight put on the pins in the upright position.  To fix it, I used a leftover piece of the 2x4 support wood at a notched angle to brace the back when it's in place and then left it freestanding for removal when you want to fold it up.  I'm still not very happy with this setup as anyone sitting there for the first time won't trust the brace to hold with the amount of creaking and give it allows.  It's also only built for one position when upright and you have to do something with the brace wood when it's folded down.  On top of all that, the chair itself is a little big for your averaged size person.  I fit comfortably well in it but you'd have to 6' or better to agree with me on that one.

Now we're talking.  And now you know which side
is hydrophobic, fragile, and must be kept upright
On my second design, I wanted to include more flexibility in the seat back position and make it a hell of a lot easier to adjust so I used something more akin to a modern chaise lounge.  I attached an extra set of supports to the seat back and cut two notches for a couple of choices of recline angle.  The result was a vast improvement over the original as it's much more stable and has a wider range.  The drawbacks are that it does not fold flat and is heavier because of the added weight of the supports and hardware.  Even with those negative points, I think I will remake the original design to use the adjustable incline support system and work out a way to make it fully collapsible as well.

Two angles are better than one?
All in all, my first foray into working with pallets was a success and I half-heartedly look forward to the radiator shop getting in more pallets.  My fear now is that I can't keep up fast enough building these types of things or coming up with new ideas before they consign them to the trash.  It's ridiculous that a 4' by 6' pallet should have one use and then discarded.  Luckily, I'm not the only one that thinks this way. One of my favorites is these guys, Viridian Hardwoods, which specialize in foreign hardwoods that arrive as pallets from other countries.  That doesn't mean there's nothing we can do with domestic soft-wood pallets either.  Pinterest, DIY, and a 96,798 other sites have ideas for "Reusing Pallets."  Why waste good wood?

Monday, October 8, 2012

Framed

In some of my free time (mostly at night after the kid is asleep and I can't do anything loud with the power tools), I still like to dabble in some amateur art just so I don't completely lose the skills that I paid my alma mater to teach me.  After having some of my work framed years ago for some sold pieces, I was shocked by how much it cost to have a painting framed.  At that time and even today, the cost to frame one piece seemed to be as much as I value the actual painting at.  After that initial surprise I made some attempts at cheaper framing with buying whole mat boards, glass, and metal assembly frames which cut the cost by more than half and then I took a long hiatus from making pretty much anything.

From airplanes to wall covering.
Prior to my long hiatus, I did make one frame from scratch when I had easy access to a wonderful wood workshop and a clear goal in mind.  I wanted a frame for one piece that I was working on that was not pre-cut from a factory.  The same wonderful people (thank you Millers!) that had the workshop were also rebuilding a 1927 Stearman Travelair bi-plane and had just ordered a new engine part for it.  The crate that it came in consisted of some perfect wood pieces that I wanted to use and so I drug it home and disassembled the whole thing.  There was some great industrial character to the wood including the metal join pieces which were still sharp enough to give a reminder nick or two about the caution that should be taken with repurposed material.  But they also add to the character of it and now, when I think about the piece, I can't really think of it in another frame.
Caution, sharp!

If you look closely, you can see notches from the
original milling process.
Since that time, I've gone back to work painting again and I've intentionally steared clear of having to buy frames, especially since I have the materials needed readily available.  The materials themselves have often been cheap to free depending on where they've come from and I feel they add much much more character to the pieces than a near perfect, professional frame does.  As with the frames, we are not perfect and the imperfections in us and our work help define who we are.  With one of my later frames, I wanted a more crisp, clean look than the rugged timeworn look that most of my frames tend towards.  For it, I used some leftover 2x2s from my front deck and with the use of a handy router, miter saw, and some leftover mat board, made a decent wood frame with some flaws that are more noticeable upon closer inspection but I love them for it.  They belie the fact that this is not perfect and that material used in the making is reflective of the actual content of the picture.  I considered a pure black at first but then realized some leftover walnut stain that I had would be perfect.  In a double application it made it appear black from faraway but with good soft lighting, the wood grain glows.

After that I made a pair of frames where I wanted their former lives obvious.  For one, I used leftover scraps from the old hardwood floors from our home that we were unable to use when we restored the rest.  The wood was covered in paint and plaster splotches which I left on.  I loved the wood itself for some of the rich grains and also the stains from it's previous life as a front deck but I'm still not sold on the splotches with the painting itself.  They just seem too darn happy for a cloudy Victoria beach.  For the other, I set out on a mission to find some old rough-cut timber just like the joists in our 100+ year old home.  We took a trip the Rebuilding Center and I found some beautiful 2x4 rough cut that even had a square nail head still anchored.  The rich red color of the wood, the tight grains, and the old sawmill marks from the blade worked perfectly with the painting I wanted to frame and I will definitely be coming back to this type of resource again.  To help stabilize the frame I also used some copper strapping on the corners.  I couldn't get a shot that wasn't blurry but I love the look of it as it complements the deep reds of this antique wood and it does a great job of pulling the industrial aspects of the painting into its surrounding as well as keeping the frame together well!
Nails and saw marks are a wonderful thing.


The frame has to look good so folks won't pay attention
to the painting.
 Lastly, after my tinkering with building a cat tower (see my last post), I wanted to continue the use of driftwood in purposeful applications.  It just so happen to fit right in with the painting I was currently working on anyway, so we all took a family bike ride down to the river.  After poking around for a couple hours, I had enough pieces of wood to work with and we headed back.  My original thought was to carve out nice crisp notches to join the sides of the frame together but as I thought of how I would fasten them, I couldn't think of something that looked natural enough for what I wanted.  So I ended up using some notching to keep the corners somewhat centered and then bound them with sisal twine.  Not only was it easier and more natural looking, it enhanced even further the relation of the frame to the painting.


I'm not sure what's next on the horizon but I think it will involve some repurposed metal and wood.  Either way, I'm finding that I truly enjoy crafting the frames nearly as much as the art and I think that they fit better with what I want than anything over the counter.  Finally, as you know the bottom line is always a consideration, the most expensive any of these frames were would be around $70 in materials.  The driftwood frame was about $5 for eye screws and sisal twine (which I already had laying around for gardening).  Probably the best deal you can find, both economically and sustainably, is an already produced frame that matches the size and style you need.  However, that can be like looking for a needle in a haystack so crafting your own may be a great way to go.

Friday, July 13, 2012

Where's the Tuna Tier?

What do you get when cross driftwood with a god-awful faux-hair ocean blue shag blanket?  Leisure luxury viewing for the felines of the house.  I wish I could say this was an original idea but I've been lacking in the originality department lately and this was actually borrowed from the some of the coolest cat towers we had a chance to see at Canine Utopia.  We had been talking sometime about getting our two not-at-all spoiled cats a perch of their own rather than make them mercilessly use the window sills when they wanted to enjoy a taste of the great outdoors but we were never a fan of the carpet on cardboard variety out there.  When we saw the pieces of art in the store window we both thought, "Awesome.  How much?"  Turns out that it must take quite a bit of labor and materials to make the beautiful towers in the window because they were definitely out of our price range.  So, being lucky enough to know some good sources of driftwood, a plan was hatched.

Doesn't this just exude 'ocean'?  That
would explain the sand in your shorts.
Despite our original intention of going down to the river and selecting some prime driftwood ourselves, we happened to stroll by our neighbor's of two blocks away and noticed a large selection of driftwood lying up against their shed.  It turned out nicely that they had done all the hard work for us intending them for another project but in the end only used one massive piece and had a bunch of timbers left over.  We picked out four nice pieces and hauled 'em home.  I left the wife in charge of finding the appropriate textile material to cover the platforms and, after her and the kiddo had  a fruitful day at Goodwill, I came home to something unexpected.  Apparently the cats were to get their very own ocean-at-home experience since they were unlikely to ever visit the actual beach house.  What the heck, I ran with it.

Three legged stool anyone?
To build, I pulled some excess particle board out of the basement that I had intended to use for watercolor backing for years but never needed; utilized some excess 3" screws to anchor the driftwood columns to the base; borrowed another small piece of OSB from a neighbor leftover from his chicken coop build; and ended up having to the hardware store for some 1/4" x 3" lag screws and accompanying washers.  Sadly, the faux-hair ocean blanket was the most expensive item at $6.99 making a grand total of $8.68 if you don't count the beer that will be making an appearance on my neighbor's porch in the very near future.  Compared to the approx. $500 retail price range we were looking at, I think we did fairly well.  Sadly, I actually ended up with a larger chunk of excess OSB than the particle board I used for the base but now that all the excess lumber I had under the deck has gone to the beach, it can stay there for a few years.


You'll notice only two tiers. 
Two tiers = no tuna tier = unhappy cats.
My original plans did include a third tier which my wife nixed as we do live in a small house and this was already looking like it might be a bit large.  The cats, on the other hand, are demanding a third tier, replete with an unending supply of tuna.  Dream big, cats, dream big.

Monday, May 14, 2012

On the Fence


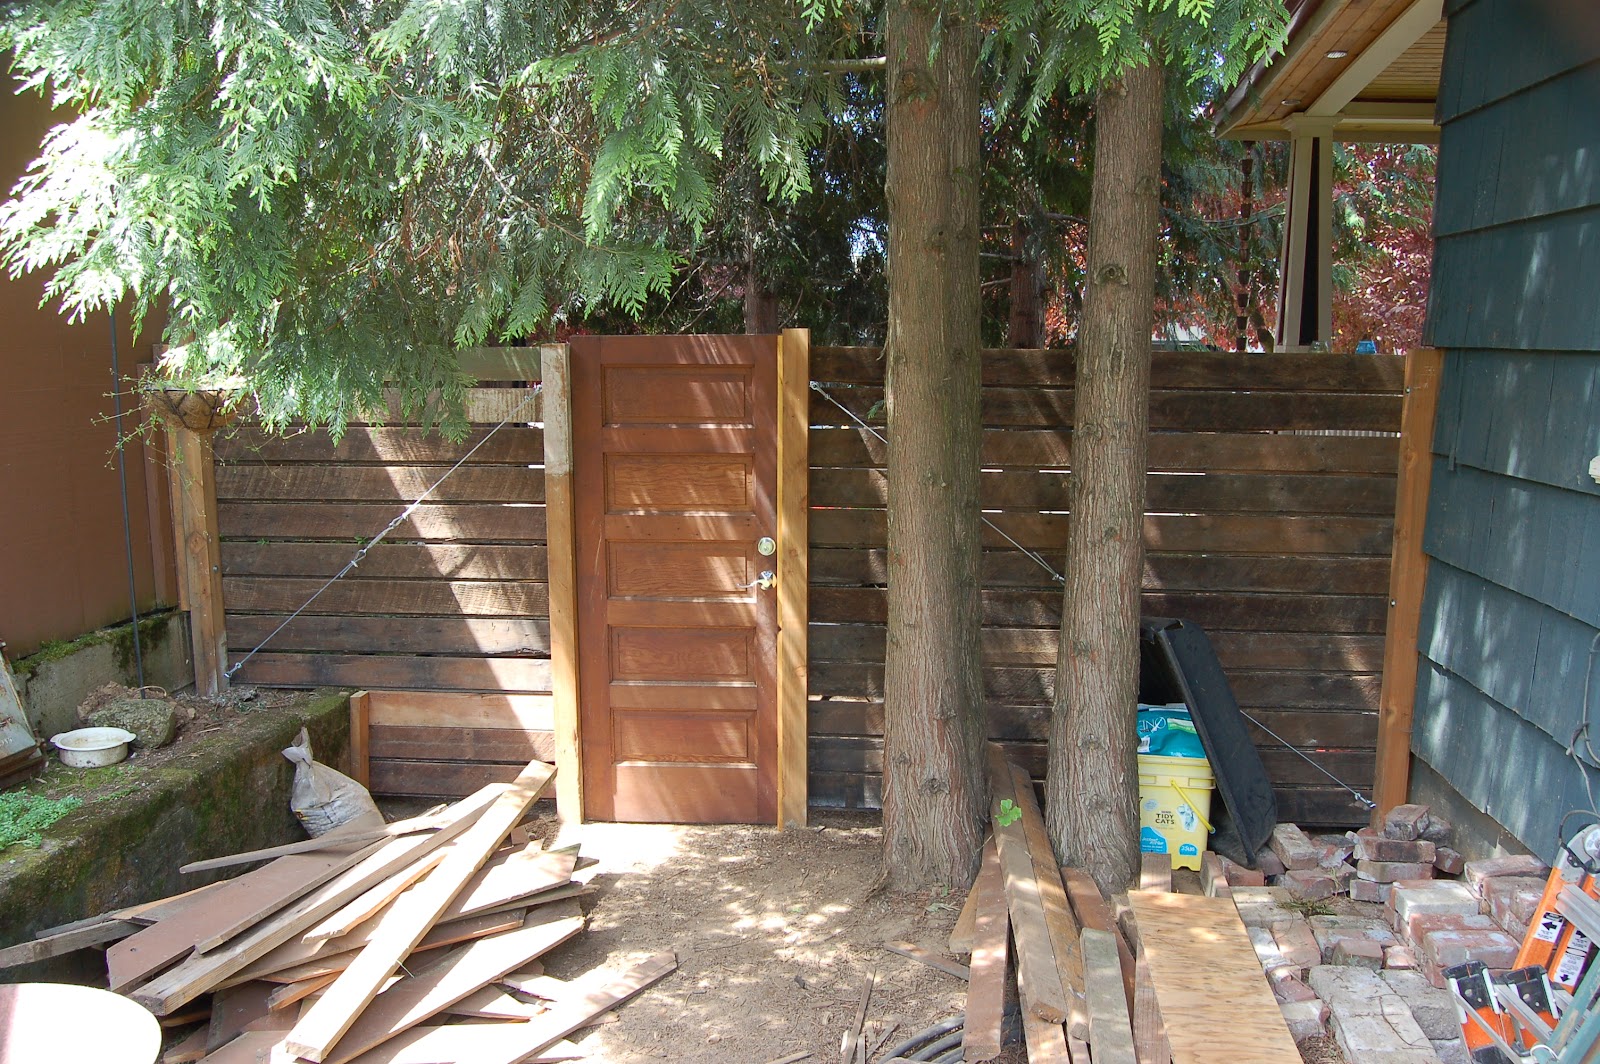
During the start of the front porch project, I had to temporarily move the side fence that separated our front yard from the rear.  Of course, "temporary" is a nice relative word and when I say "temporary" I mean it's been there for about two years now.  Since my larger summer construction projects have been put on hold for lack of funds (another house issue is going to take some major capital so we're in saving mode), I decided to at least wrap up this loose end since it would be fairly quick and inexpensive.  Another reason I really wanted to see this completed is because our only access to the backyard is through the house or the rear gate which requires using stairs and can be pain to get stuff in and out of the backyard easily.  I also wanted to make this as sustainable as I could and so we set off for the Rebuilding Center in Portland to see what we could use.

I recall seeing a fence on one of our travels that had used old house or barn siding as the fencing which I really liked so I thought I would look for the same.  I found enough lap siding that looked as if it had come off of a pre-WWII house which cost me about $60 for the usable board lengths.  We also found a solid wood door that was smaller than a standard size but would work perfectly for our gate for $20.  On hand I had a couple of decent 4x4 posts I was able to salvage from the temporary fence.  On the days it didn't rain, I stripped the paint off the old siding and door and then sealed them with stain/sealer that I had leftover from both the shed and front porch.  I also picked up a used latch from Habitat for Humanity's ReStore for $8.  New materials included cables, turnbuckles, thimbles, and eyebolts since I wanted to make sure the weight of the door didn't pull the post down.  I also had to purchase two new treated posts, concrete, and another box of stainless steel screws.  The double-sided lock was the most expensive single item but we kind of needed it to make sure the dog didn't get out...yet again.  Another tangential cost was the new circular saw I had to pickup at the hardware store after my old free hand-me-down quit working completely. 

The finished product.  Actually finished!
100%, really!
The project turned out pretty good and I'm especially happy with the rustic look of the old siding and how the warm color of the stain gives it a new life.  Of course like any project I seem to do, it's fully functioning but still only about 99% done.  Over the gate I'll be putting a pergola with the leftover scraps I had from the old fence that will match our gate on the other side of the house.  You wouldn't believe how nice it is to not have have carry the lawnmower from the front to the backyard every time I need to mow the lawn.

Used materials: $88 not including scrap or leftover material I already had on hand.
New materials: $160 + $60 incidental for a new circular saw.
Time:  The most time-consuming part was the stripping of the old paint and the staining because the weeks I was working were off-an-on showers most days and the sealer/stain recommended at least 48 hours of dry conditions.  Over the course of a few hours here and there after work and a few half-days on the weekends, it took me about a month from start to finish.

UPDATE:  A few weeks later I was able to finish putting the pergola on top.  Fin.

Wednesday, February 15, 2012

A Place to Hang Your Hat

So, it has been quite awhile since I've posted. That doesn't mean I haven't been busy with projects. Life just does that to you sometimes. I just completed my latest project, a fairly quick one as they go, and it reminded me of this blog so I thought I'd post it up and hopefully follow up with more entries on all the other things that have been occupying my spare time. First though, some background.

I applied for and received a promotion at work over a year ago, coincidentally right around the time I stopped blogging. With the new job I also got to move into my own office and for that amount of time, the office has been barren except for the practical necessities to do my job. I've been using a spare office chair as a place to hang the extra raincoat, sweatshirt, company hat, and backpack when I'm in and it looks rather sloppy. A couple weeks ago we had an intern with us on a detail and she commented how my office was pretty boring. This kind of put me in motion to actually make this coat rack which I'd been contemplating for a long time. I also brought in some artwork that had been sitting down in our basement collecting dust for lack of wall space in the rest of the house.

After building our front porch, I've had some scrap material left over that I've been trying to find some good use for besides firewood. I especially had way too many 2"x 2" railing slats left over that I had pre-cut but somehow grossly overestimated how many were necessary. So I thought I'd try to make my own humble glue-lam post out of these slats and join them up vertically with lap joins and make this interlocking hat tree for my office. I also wanted to get creative with a bunch of accumulated scraps of random things in the office and combine the craftsmen element of the wood work with an industrial metal element. One piece that I especially wish I had been able to incorporate was on old rock drill bit that I hauled over from Montana on the infamous move (see past posts) but alas, I just couldn't find a good way to mount the post and create a wide enough base to make it stable. That and the bit itself was very heavy, probably as much as the whole hat tree. The end product doesn't have nearly the industrial touch that I originally intended but I still kept some of it in and the rest would have been hidden by the coats anyway. During the process of building it, I discovered that my glue-lam technique needs a little bit of work but overall I was happy with my rookie attempt. At the top part of the post I had an alignment issue with one of the pieces of wood and I took the opportunity to get my new carving knives out and practice a bit. Part of the main post has a polished steel bar that was leftover from a light fixture we put in the house and it was too nice to just recycle. So, at the top end of the bar I carved the wood to faintly resemble a whale and the bottom end a whaling ship in homage to the recently released Moby Dick in Pictures. Finally for the base, I used some beat up old 2"x 4"s I had around the basement. I sanded off the bulk of the paint but left enough to show it's prior use and abuse. I finished it all off with a coat of natural stain and left it at that.

One thing that I noticed after the completion of the tree was the accidental progression of age in the wood from the bottom to the top. At the very bottom are some chunks of old growth Douglas Fir that I had bought from a salvage store and used to make a painting frame. It amazes me how tight the grains are compared to the younger wood. The upper part of the base is some newer Doug Fir but still probably from a piece that has been our house for at least 20-30 years. Even comparing those grains to Pine that I used for main post you see a noticeable difference. What I love about this project the most (aside from finally getting those coats, hats, and bags off the chair in the office) is that nothing I used was something I had to purchase new. Everything, down to the bolts and washers was something I already had lying around at home. I've cleared a bit more room from underneath my front porch, I cleaned out some the excess nuts, bolts, and washers that were filling up my miscellaneous drawers, and I put some otherwise wasted material to good use. If you're interested in some other amazing reuse projects, I would recommend Phoenix Commotion, a group that has not only done amazing work in their use of recycled/reused/re-purposed materials but also with an incredible socially-conscience purpose in mind. Now, the only thing left to really finish this project off is a good topper. If you see something, let me know.