Monday, May 14, 2012

On the Fence


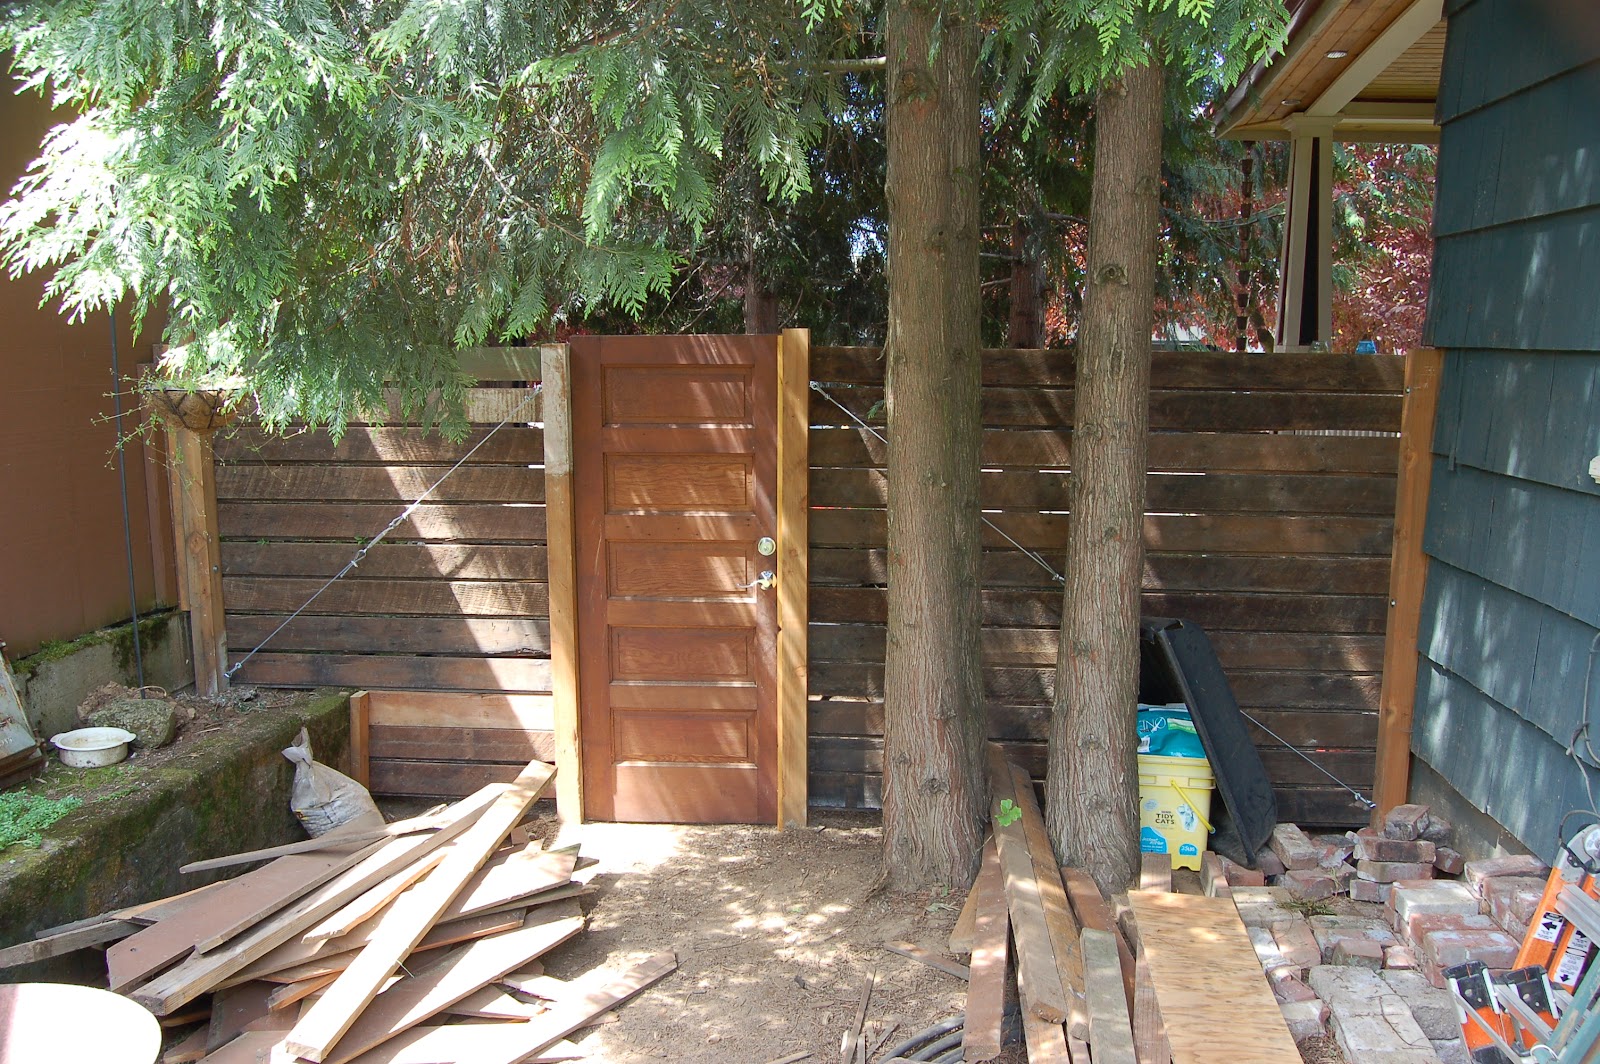
During the start of the front porch project, I had to temporarily move the side fence that separated our front yard from the rear.  Of course, "temporary" is a nice relative word and when I say "temporary" I mean it's been there for about two years now.  Since my larger summer construction projects have been put on hold for lack of funds (another house issue is going to take some major capital so we're in saving mode), I decided to at least wrap up this loose end since it would be fairly quick and inexpensive.  Another reason I really wanted to see this completed is because our only access to the backyard is through the house or the rear gate which requires using stairs and can be pain to get stuff in and out of the backyard easily.  I also wanted to make this as sustainable as I could and so we set off for the Rebuilding Center in Portland to see what we could use.

I recall seeing a fence on one of our travels that had used old house or barn siding as the fencing which I really liked so I thought I would look for the same.  I found enough lap siding that looked as if it had come off of a pre-WWII house which cost me about $60 for the usable board lengths.  We also found a solid wood door that was smaller than a standard size but would work perfectly for our gate for $20.  On hand I had a couple of decent 4x4 posts I was able to salvage from the temporary fence.  On the days it didn't rain, I stripped the paint off the old siding and door and then sealed them with stain/sealer that I had leftover from both the shed and front porch.  I also picked up a used latch from Habitat for Humanity's ReStore for $8.  New materials included cables, turnbuckles, thimbles, and eyebolts since I wanted to make sure the weight of the door didn't pull the post down.  I also had to purchase two new treated posts, concrete, and another box of stainless steel screws.  The double-sided lock was the most expensive single item but we kind of needed it to make sure the dog didn't get out...yet again.  Another tangential cost was the new circular saw I had to pickup at the hardware store after my old free hand-me-down quit working completely. 

The finished product.  Actually finished!
100%, really!
The project turned out pretty good and I'm especially happy with the rustic look of the old siding and how the warm color of the stain gives it a new life.  Of course like any project I seem to do, it's fully functioning but still only about 99% done.  Over the gate I'll be putting a pergola with the leftover scraps I had from the old fence that will match our gate on the other side of the house.  You wouldn't believe how nice it is to not have have carry the lawnmower from the front to the backyard every time I need to mow the lawn.

Used materials: $88 not including scrap or leftover material I already had on hand.
New materials: $160 + $60 incidental for a new circular saw.
Time:  The most time-consuming part was the stripping of the old paint and the staining because the weeks I was working were off-an-on showers most days and the sealer/stain recommended at least 48 hours of dry conditions.  Over the course of a few hours here and there after work and a few half-days on the weekends, it took me about a month from start to finish.

UPDATE:  A few weeks later I was able to finish putting the pergola on top.  Fin.

Wednesday, February 15, 2012

A Place to Hang Your Hat

So, it has been quite awhile since I've posted. That doesn't mean I haven't been busy with projects. Life just does that to you sometimes. I just completed my latest project, a fairly quick one as they go, and it reminded me of this blog so I thought I'd post it up and hopefully follow up with more entries on all the other things that have been occupying my spare time. First though, some background.

I applied for and received a promotion at work over a year ago, coincidentally right around the time I stopped blogging. With the new job I also got to move into my own office and for that amount of time, the office has been barren except for the practical necessities to do my job. I've been using a spare office chair as a place to hang the extra raincoat, sweatshirt, company hat, and backpack when I'm in and it looks rather sloppy. A couple weeks ago we had an intern with us on a detail and she commented how my office was pretty boring. This kind of put me in motion to actually make this coat rack which I'd been contemplating for a long time. I also brought in some artwork that had been sitting down in our basement collecting dust for lack of wall space in the rest of the house.

After building our front porch, I've had some scrap material left over that I've been trying to find some good use for besides firewood. I especially had way too many 2"x 2" railing slats left over that I had pre-cut but somehow grossly overestimated how many were necessary. So I thought I'd try to make my own humble glue-lam post out of these slats and join them up vertically with lap joins and make this interlocking hat tree for my office. I also wanted to get creative with a bunch of accumulated scraps of random things in the office and combine the craftsmen element of the wood work with an industrial metal element. One piece that I especially wish I had been able to incorporate was on old rock drill bit that I hauled over from Montana on the infamous move (see past posts) but alas, I just couldn't find a good way to mount the post and create a wide enough base to make it stable. That and the bit itself was very heavy, probably as much as the whole hat tree. The end product doesn't have nearly the industrial touch that I originally intended but I still kept some of it in and the rest would have been hidden by the coats anyway. During the process of building it, I discovered that my glue-lam technique needs a little bit of work but overall I was happy with my rookie attempt. At the top part of the post I had an alignment issue with one of the pieces of wood and I took the opportunity to get my new carving knives out and practice a bit. Part of the main post has a polished steel bar that was leftover from a light fixture we put in the house and it was too nice to just recycle. So, at the top end of the bar I carved the wood to faintly resemble a whale and the bottom end a whaling ship in homage to the recently released Moby Dick in Pictures. Finally for the base, I used some beat up old 2"x 4"s I had around the basement. I sanded off the bulk of the paint but left enough to show it's prior use and abuse. I finished it all off with a coat of natural stain and left it at that.

One thing that I noticed after the completion of the tree was the accidental progression of age in the wood from the bottom to the top. At the very bottom are some chunks of old growth Douglas Fir that I had bought from a salvage store and used to make a painting frame. It amazes me how tight the grains are compared to the younger wood. The upper part of the base is some newer Doug Fir but still probably from a piece that has been our house for at least 20-30 years. Even comparing those grains to Pine that I used for main post you see a noticeable difference. What I love about this project the most (aside from finally getting those coats, hats, and bags off the chair in the office) is that nothing I used was something I had to purchase new. Everything, down to the bolts and washers was something I already had lying around at home. I've cleared a bit more room from underneath my front porch, I cleaned out some the excess nuts, bolts, and washers that were filling up my miscellaneous drawers, and I put some otherwise wasted material to good use. If you're interested in some other amazing reuse projects, I would recommend Phoenix Commotion, a group that has not only done amazing work in their use of recycled/reused/re-purposed materials but also with an incredible socially-conscience purpose in mind. Now, the only thing left to really finish this project off is a good topper. If you see something, let me know.

Wednesday, June 30, 2010

The Tool Shed


To really explain how bent I am when it comes to having projects, our home is exhibit A. The project of projects for DIYers, a home can be an unending laundry list of projects, some looked for and most catching you with your pants down. When my wife and I started considering what we wanted in a home we set our criteria as most house-shoppers would: price, size, location, amenities, style, quality, and age were all considered as high priorities. I was also semi-conscious of another priority lurking just below the surface; potential for expansion and modification.


When we finally found the right home for us, it was indeed everything we had looked for and the potential was endless. Immediately there were tasks to be done such as paint over the sterile off-white walls and add some character, remove the neglected and overgrown multiple rows of hedges and shrubs, and fix a variety of other minor items. One thing severely lacking was any sort of storage area for outdoor tools. The house had neither shed nor garage nor any other sort of covered area so my first real project was to build a shed to house all of our newly acquired gardening and maintenance implements.


At one point in time, our lot was under the same ownership as our neighbor and the previous owner had decided to put a door in the middle of the fence that separated the two. By the time we moved, the key to the door had been long lost and the lots had been sold off individually. So what do you do with an eyesore door to nowhere? What a perfect place for a shed! Because our lot is so narrow, a pre-built wood shed would not fit so a custom one had to be made. Looking back, I wish I had spent a bit more time trying to source reusable or reclaimed materials but for a small, first project, I think I did okay. We picked up some old windows and door from the Rebuilding Center in Portland and I was able to take the remaining cedar siding and some old gutters from my parents' lake cabin they had recently finished. Another neighbor had a leftover downspout so I ended up just having to purchase new the framing lumber, sheathing, roofing, and hardware. I also put in some pegboard inside to help organize the space since it is a very small shed. Now our shovels and lawnchairs stay dry and mostly rust-free and we have a place to quickly toss the clutter into when we need a quick clean-up in the backyard. One of these days we'll get the garage built and we may no longer need the shed but for now it's very convenient.

Monday, June 21, 2010

Can You Have Enough Lawn Chairs?


As I mentioned in my last blog entry, we brought a lot of stuff back from Missoula when we moved my grandfather in-law. Included in the giant U-Haul were three 60's vintage metal lawn chairs that my wife wanted to restore and use. Apparently you cannot have too many lawn chairs because we were about to accumulate these as well. Like the Monarch stove, the chairs had sat outside for a long time and even though they were under a covered area, they were still quite rusty. Despite the rust they seemed to be mostly intact without any major damage so we tossed in them the back of the '66 and brought them home. Once we got them back, we toyed with the idea of brushing, scraping, and sanding them down ourselves but after taking a closer look we determined we would be better off having them sandblasted professionally. The hardware had rusted together so badly that the bolts would need to be drilled out and there were some holes in the legs that needed to be patched and I don't have a welder.
While looking for sandblasting shops I stumbled upon a website for a local powder-coating specialist. I hadn't considered the idea of powder-coating, thinking that we'd just shoot them with a couple layers of outdoor enamel, but after doing some research I thought this would be a much better option, especially since these chairs would be put back into service outdoors in the rainy Northwest. I called the vendor up who was somewhat surprised at the request (he typically did motorcycle parts) but agreed to take a look. We hauled the chairs over and for $300 he agreed to disassemble, sandblast, and powder coat all three. I thought it was steal. During the process, he did find one section of a leg that required some spot welding to reinforce the rust-eaten metal but when they were done they were beautiful. We put some rubber hose on the leg bottoms to save them from being scratched on the pavement in our backyard and now we have some great vintage seats to relax in. The design of the chairs is a typical 60's modern look that I admire. Although our home is becoming a weird blend of 20's and 60's era decor, not exactly complementary of each other, I think there are some similarities in the intent of much of the design aspects. The 20's still saw major influence of the Craftsman style design on the west coast (there are several typical Craftsman bungalows in our neighborhood) and the less ostentatious designs of the 60's remind me a bit of that with their attention to practical use without completely ignoring aesthetics. This last picture is the final product, on our at-the-time nearly finished front porch. Don't worry, I know what you're thinking, "Where are the cold-ones that should be enjoyed while using said chairs?" I assure you, I quickly remedied that situation.

Wednesday, June 16, 2010

The 1928 Monarch Malleable Stove


On New Year's Eve day, I picked up my friend from his house at 7 am to make the nearly 13 hour trip to Missoula, MT. We were driving there to spend the weekend packing up and moving my wife's grandfather back to our hometown where he would be near his family and closer to advanced medical facilities. As luck would have it, I had the 24-hour stomach flu and was trying hard just to keep water down. My friend, who can typically lift the heaviest of objects effortlessly, had cracked a rib two days prior. When we finally arrived after driving through snow, ice, and delays at the auto part store, we were the most pathetic 'help' anyone would want to see. Yet, when my father in-law saw us, he was still so happy he almost cried.

He had arrived several days earlier to start boxing everything up and during that time, he and my grandfather in-law had almost driven each other mad. Best of all, this ongoing getting-on-nerves culminated in a dispute over fruit pies. You know the little individually wrapped ones that are chock-full of preservatives and kind of taste like sugar-glazed cardboard with some jelly filling? Yeah, those ones. We had a good laugh over that, or at least we would have if my stomach still didn't feel like I'd been deep-sea fishing all day and my friend wasn't wincing at his cracked rib every 10 minutes. Sadly, we spent our New Year's Eve in the living room at that old house half-consciously watching a football game instead of reveling in downtown Missoula with the rest of the crowd.

By the next day, I was feeling much better and we continued boxing, labelling, and sorting. Grandpa had collected quite a few vintage things over the years including a pedal-pump organ that was brought to Idaho in a covered wagon, vintage 60's metal lawn chairs and dining table, an original Forest Service-commissioned trail-bike, a '66 Chevy C10 Fleetside pickup, and two antique wood/gas stoves. Growing up, my wife knew about all these treasures and I had merely glimpsed them during our brief visits so when she found out we were moving him, she asked that we make sure and bring as many of these back with us rather than just try and sell them. Often, as we were huffing and puffing our way up the very steep stairs from the basement with some of the heavier items we would ask Grandpa how the heck he got them down there and he'd say with a straight face, "By myself." Guess you just can't find good help these days.

The lawn chairs and the stoves had been outside for a long time under a little covered patio but they had still seen a fair amount of weathering. Of the two stoves, one looked to be in pretty bad shape and was a rather unremarkable model but the other was emblazoned "Monarch Malleable" on the oven door and, though quite rusted in parts, had a wonderful enamel coating that just looked classic. So I decided to bring the Monarch back. Disassembling just the top part would've taken half a day with the amount of rust on the bolts so we opted to lift the entire thing into the U-haul. Talk about heavy. Thankfully, it was one of the last things to load because after that we were done doing anything productive.

Since then, we've had the old stove in the back yard until better weather arrived and I recently started disassembling the thing. It's been a fun project and I've learned a lot about these old stoves. Most helpful was www.monarchrange.com that gave a lot of history of the Malleable Iron Range company and the website's administrator who was able to send me scanned copies of their old catalogs and helped me identify the year and model of our particular stove. I hope to have the stove restored soon and post some of my progress as I go along. Projects like this have always intrigued me and that's why I'm starting this blog, to retain my own thoughts about the various good and bad projects I consider tackling and then share my joy or misery with anyone that cares.